|
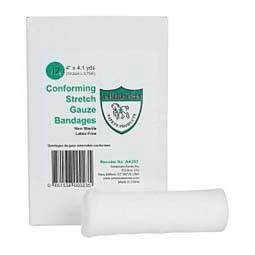
This morning I was reminded just how often and unexpectedly horses lose their ever-loving minds. I was feeding this morning, it was dark and I have a head lamp to see. My 33 year old horse DD doesn’t like the head lamp very much but has been tolerant, if a bit skittish, thus far. Well that flew out the window this morning because, with horses, age does not equal wisdom. DD is leery of the lone mare in the group (which I don’t blame…she’s all mare) so I walked him around her and let him go to walk himself to his feed stall as he has done every day (twice a day) for months and months. I turned around to put up a rail I use to keep the horses separated while eating and heard the distinctive splashing of mud from a fast moving horse. As I turned around, DD, who was running straight towards me, tried to do a full stop (spraying mud and muck all over me). His back feet slid out from under him, he went down on his butt and then rolled sideways right into the wooden fence rail, breaking the rail. He ended up on the outside of the fence. After taking a beat to check him I went to get a screwdriver to take the rails down and get him back into the field. Before I could do that he decided to, again, lose his ever loving mind and bolted straight into the polyrope fencing. The polyrope has a 1,000lbs test and there were 3 lines of it so, it doesn’t actually break, but all of the insulators break--down the entire fence line. Somehow DD got through and back into the field. It took me another 5 minutes to catch him and walk his bum to his feed stall. Fortunately he was unharmed (not so for my fence). This incident was a good reminder that horses are going to hurt themselves. Sometimes I think they actually try to get hurt. So, if you own a horse you are going to be treating that horse for an injury at some point, it is an inevitable fact. Horses are flight animals, they are hardwired to flee from whatever they perceive as danger, whether that’s a pack of wolves or a head lamp really doesn’t matter. As a horse owner, one of your responsibilities is to be prepared to assist your injured horse so, having a stocked vet kit is essential. Below is a list of 10 essential items to have in the kit. 1. Bandages – Have a variety of bandages for a variety of injuries. Some bandage material that you should have is Vetwrap, elastic adhesive tape, gauze, cotton roll, waterproof tape, duct tape and standing wraps.
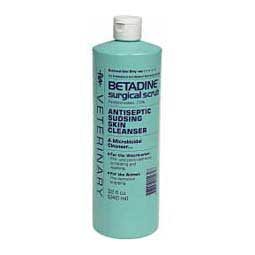
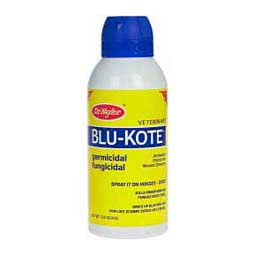
2. Antibacterial ointment – Fura-Zone is a nitrofurazone antibacterial and it works very well. 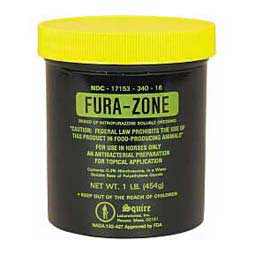 3. Antiseptic – Betadine solution is a solid go-to. Blu-Kote is a great all-purpose dressing as long as you don’t mind the blue staining (it gets everywhere).
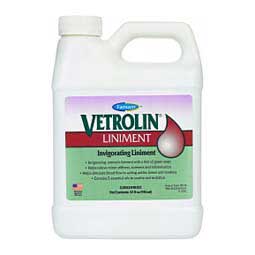
4. Thermometer  5. Syringes – You will be surprised how often you will need syringes (without the needle of course). Nowadays a lot of oral medications are made to dissolve in water so you can put the pills in a syringe, add water, shake and squirt right into the mouth, easy-peasy.  6. Liniment – A good liniment is essential and there are a ton of different ones on the market. I have always been partial to Vetrolin and Green Cool Pack Jelly. It’s not hard to make your own as well.
7. Poultice – Like liniments there are a variety on the market and, like liniments, it’s not hard to make your own. There is a lot to be said about a good poultice and liniment so make sure you have these on-hand. 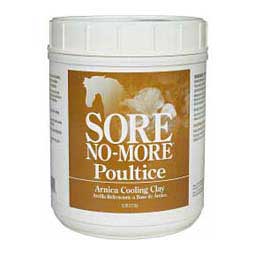 8. DMSO – This is a wonderful little product. DMSO stands for dimethyl sulfoxide. DMSO is a non-steriodal anti-inflammatory drug (NSAID). DMSO can pass through cell membranes as readily as water and without damage to the cells. It also readily dissolves other molecules so it can “carry” other things into the cells. This is one of the things that make DMSO great. It can be used as a carrier for other things to get into the body quickly. For instance, if you mix liniment with DMSO and put is on a horse’s leg, the DMSO is going to carry the liniment into the cells of the horse’s leg much quicker than applying the liniment alone. This, of course, is also a reason to be careful when using DMSO. By itself, it can also be applied to the horse as a topical NSAID pain reliever. Remember to wear gloves when handling DMSO. DMSO is safe for humans and will not hurt you if you get it on your skin but you sure will know it as it’s a weird feeling and leaves a funky taste in your mouth (some say the taste is like garlic). 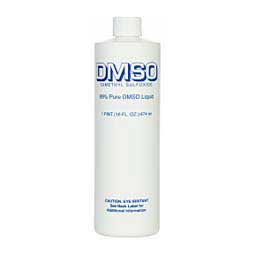 9. Bute – Phenylbutazone – I would say Bute is the most commonly prescribed pain reliever and anti-inflammatory for horses. It comes in tablets, paste and powder. The vet can deliver it by IV as well and a horse owner should only have the vet administer an IV dose. Bute can cause severe damage to the muscle tissue if it is administered IM or if some leaks out of the vein when administering by IV which is why only a vet should do this. I keep this on-hand for my laminitic horse but it is always good to have on-hand. With Bute you have to be careful with dosage and length of use. If you have any hesitation on dosage or length of use, ask your vet.  10. Vet’s Contact Information – If you don’t have a good vet, get one. I absolutely love my vets. I have their numbers programmed into my phone but it’s good to have them in your vet kit as well in case someone else is doing the initial triage.
This is by no means a complete list but a list of the bare essentials. Every owner has products they prefer and individual ways of treating injuries but with the products listed above you should have a well-rounded vet kit to treat or, at least, triage most injuries until your vet can arrive.
0 Comments
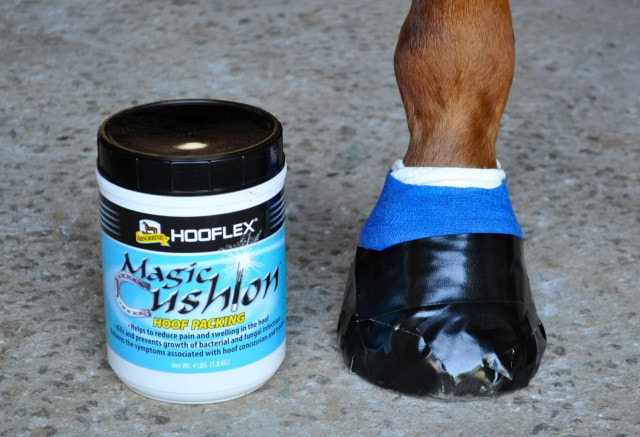
 Magic Cushion is a product made by Absorbine. It comes in regular and Xtreme – the difference (besides price) is the percentage of ingredients (Xtreme has a higher percentage). Magic Cushion is a hoof packing product. It claims to reduce heat in the hoof and hoof soreness for up to 24 hours. There are 2 active ingredients: turpentine and iodine. Turpentine – better known in the equine world as Venice Turpentine – is made from tree rosen (true Venice turpentine comes from western larch tree rosin). Turpentine is an astringent. An astringent is something that causes the contraction of skin cells and other body tissues. Turpentine is used on the bottom of the hoof to thicken the sole on horses with sore or thin soles.  Iodine – is used to harden the horse’s sole. It is also used to treat thrush.  There are 2 inactive ingredients: natural leather fiber and rosen. The original Magic Cushion is 26.6% turpentine and 0.06% iodine. Magic Cushion Xtreme is 27% turpentine and .12% iodine.  How to Use: For a barefoot horse you want to pack the Magic Cushion into the frog area and cover the entire bottom of the hoof back to the heel bulb. Then you want to wrap the hoof. There are many ways to wrap a hoof. It can be as simple as wrapping the hoof in duct tape (this is usually what I do) to using a pad on the bottom of the hoof, wrapped first with vet wrap or some other more breathable wrap then finally wrapped with duct tape. You can also use a hoof boot if your horse does not object. For a shod horse, you can simply fill the hoof up with Magic Cushion to the level of the bottom of the shoe. The shoe will supposedly keep the packing in. I have never tried this as my horses don’t have shoes. I have kept the hoof wrapped and packed for 2 days at a time. Absorbine says to change the pack every day. I would not keep the hoof wrapped for more than 2 days at a time – I don’t think there is any effect after that. When I do unwrap the hoof, if I am not repacking, I don’t clean the pack out. I let it naturally wear off.
My Experience: I have both Magic Cushion and Magic Cushion Xtreme and have used both. My purpose for getting them is to help the recovery of a laminitic horse. The product itself is thick and gooey and will get all over everything. It is very tar-like/oily and difficult to wash off (think of pine resin). So, WEAR GLOVES. Pick out hooves before using the product or your hoof pick will be covered in it. 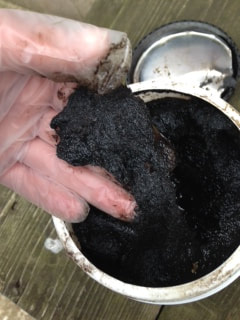 Other than the messiness, it is an easy product to use.
I found that the Magic Cushion Xtreme worked well for assisting in minimizing the symptoms of lameness associated with laminitis. To be clear, I changed the pack daily and the horse also received other treatment (including bute) but, she had already been receiving the other treatment when I started using Magic Cushion. The fact that I could see a difference while using Magic Cushion even while receiving other treatments is an indicator to me that the Magic Cushion has effectiveness. Recently I used the original Magic Cushion for the laminitic horse. I packed the two front hooves and wrapped them in duct tape. The horse had some immediate relief due to the cushioning effect of the pack. After a day, the horse did not act as though the pack were offering any relief. The only real drawback is the cost. A 2 pound tub is between $30 and $40 and a 4 pound tub is between $50 and $60. That being said, a tub lasts a long time. Conclusion: I would definitely recommend Magic Cushion. I believe it is a hoof packing product that does actually offer the horse temporary relief from sores hooves. If the lameness is extreme (like laminitic) I would recommend the Xtreme product. The product is most effective when it is changed on a daily basis. There is no max time limit for its use but if you are using is on a daily basis for over 7 or 10 days, you probably want to get in touch with your vet. Based on how it is used, the tubs are generous in size and last a long time making the price a bit easier to swallow.  When I was growing up in the horse world no one fed alfalfa to a horse unless it was a broodmare and then, only in the late stages of pregnancy when you didn’t want to risk her grazing on fescue. I was taught that alfalfa was not good to feed normal horses. It would cause them to be hot and could cause founder. I stayed away, very far away from alfalfa until the last couple years. Lucky me has a horse with dietary issues, a horse that has chronic laminitis that will flare up at the drop of a hat. It has become an incredible challenge to feed this horse which I will share in another post, but – this is how my love affair with alfalfa began. What is Alfalfa? Alfalfa is a perennial legume – not a grass – It is in the pea family. It likes to grow in looser, dryer soils with more alkaline soil (non-acidic). Alfalfa actually has a very long and distinguished history of feeding horses – it goes back thousands of years ago to the middle east (Iran and Iraq area). From the middle east it traveled to Europe and then across the Atlantic to the Americas. Alfalfa was used historically to feed war horses and work horses. When the US was colonized it was discovered that alfalfa grew well out west but did not thrive in the east mainly due to the difference in rain levels and soil acidity. So, since the 1800s people in the west have regularly fed their horses alfalfa because it was readily available while people in the east have shied away from it for lack of understanding and availability. Beginning in the 1900s scientists began developing alfalfa that could handle the wetter, more acidic conditions of the eastern U.S. so that now, alfalfa can be grown pretty much nationwide. 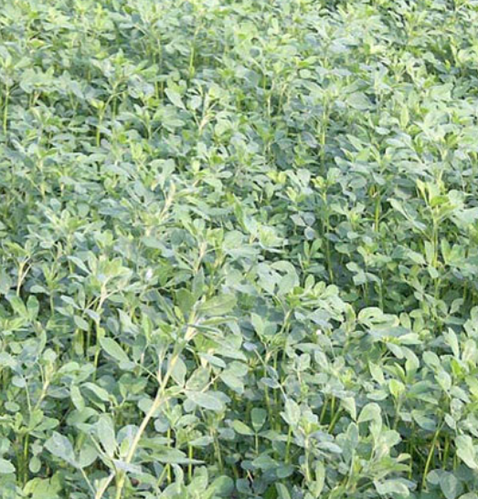 How does Alfalfa Differ from Grass? There are several main differences between alfalfa and standard grass hays like orchardgrass, timothy and fescue. 1. Protein This may be the major difference. This is why alfalfa has historically been fed to very hard working horses. It is packed with protein. Protein is, of course, essential for building and keeping muscle. Alfalfa has more protein in it than any of the grass hays with protein making up, on average, 21% whereas an average for grass hay is 10.8%. 2. Calcium Alfalfa is higher in calcium than grass hay. Horses need calcium for strong bones and teeth. They store calcium in their bones which they can use if their dietary intake is inadequate. Horses also use soluble calcium for nerve and muscle function. On the flip side, horses need phosphorus for their enzyme systems and to help produce energy. The horse’s body actually works to keep the calcium and phosphorus ratio at 2:1 or 2 parts calcium to 1 part phosphorus. Most horse owners know this ratio simply because calcium deficiency can cause a lot of issues with horses. Most commercial feeds adhere to this balance and supplement the feed to help ensure the horse gets the required calcium and phosphorus. If you feed alfalfa you will mainly see an issue with calcium in young horses where too much calcium can lead to health issues. Too little calcium can cause major health issues in horses of all ages so, err on the side of caution and make sure the horse is getting enough calcium – a little too much is not going to harm a healthy mature horse but as with everything horse-related this is a fine line so be observant . 3. Carbohydrates/Sugars/Starches Alfalfa hay is among the lowest at around 11%. This is great news for horse owners who have horses which can’t handle the carbohydrates, sugars and starches. Grass hays average around 13% and oat hay averages 22%. Of course these levels will fluctuate based on a variety of factors including time of year harvested, time of day harvested, how long it remains in the field after harvest, maturity of plant when harvested, rain fall amount etc. So, these averages are truly just averages and can range up or down by as much as 4%. Generally speaking though, alfalfa contains a lower percentage of non-structural carbohydrates (NSC) than grass hay. 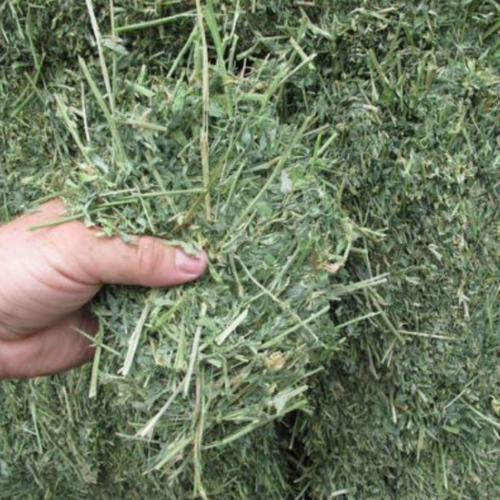 What does alfalfa DO for the horse?
What alfalfa does, in simple terms, is provide a lot of easily digestible protein to the horse. What does this mean for the horse owner? If you have an underweight horse, a hard keeper, a horse in heavy work, a broodmare, a senior horse or a horse with dietary issues like insulin resistance it means that you can provide a very palatable feed for your horse which, in most situations, is going to greatly help the horse’s situation. Alfalfa will put weight on a horse. This is important to know. If you have a horse that looks at grass and gets fat, alfalfa may not be for your horse, or, at least not in large quantities. If you have a horse that you can throw pounds of feed at and it won’t gain an ounce, alfalfa is for you. Alfalfa for seniors. Alfalfa is an easily digestible hay and it is packed with protein. This should check a lot of boxes for senior horse owners. I have 2 seniors, both lost weight last winter, one lost so much I thought something was wrong; I made a feed change over the summer and added alfalfa to their diet. Both are back in good flesh with a bit extra. Alfalfa for dietary issues. Being packed with protein and low in NSCs alfalfa is the safest hay to feed horses which are sensitive to NSCs, however, if the horse is on the heavy side, mind how much alfalfa you feed as it will surely gain weight. Alfalfa and the pocketbook. I can’t speak for alfalfa prices outside of my own area (western North Carolina) however here it is one of the more expensive hays. Timothy is the only hay I have found that is more expensive. A bale of alfalfa costs me $12.50 and lasts for 3 feedings. A bale of fescue costs between $5 and $6 and lasts 2 feedings. The horses will clean all of the alfalfa up whereas they tend to leave quite a bit of the fescue lying around (they do this with orchardgrass and timothy as well). I don’t have to feed as much alfalfa as I do other grass hay to keep the horses in the same weight. What all of this says is that, in the long run, it is cheaper to feed alfalfa than other grass hay even though the “per bale” price is more. Alfalfa cautions. There are a few cautions to feeding alfalfa which were hit on above. The first is specifically for growing horses. If you are going to feed alfalfa to growing horses be cautious and monitor the horse carefully. The high energy levels and calcium levels in alfalfa can cause developmental orthopedic disease. If you are going to feed alfalfa to an easy keeper be very observant of weight – alfalfa is built to put weight on horses. As with everything else involving horses, keep the 2:1 calcium to phosphorus ratio in mind. Because alfalfa is packed with easily digestible protein, it can have some adverse effects on horses in certain situations. For example, it can make a horse hotter (physically) so that it sweats more thus making it drink more to stay hydrated. This may not be an ideal situation for an endurance horse out on a 50 mile ride for example. In that scenario, the owner may want to withhold alfalfa during a period preceding the ride or switch to a grass hay. Because alfalfa is packed with protein and horses cannot store protein, any excess protein that is not used by the horse is flushed out of its system through the kidneys and liver (in urine). If your horse has kidney or liver problems alfalfa may not be get best option.
I was always an owner who loved to see my horses with perfectly shod hooves. To me, it was a beautiful sight and I thought it was completely essential. Over the years I learned a lot about shoeing. Unfortunately, the knowledge was mostly limited to how not all farriers are created equal and how this effected the price of my shoes. I went from paying $50 for a set of 4 shoes to paying as much as $125 for a pair of 4 shoes. Why? Because the expertise of the farrier apparently dictated this elevated price and I willingly paid a higher price also believing there was something magical about my farrier. The last farrier I used charged $80 to $90 for a set of shoes depending on whether he put clips on the shoes. He also hot shod my horses, which is always such a awing sight to me. For a simple trim he charged $60.

Still I paid these prices. Why? Well I have a Thoroughbred after all. Thoroughbreds have bad feet, that's a fact, right? He is very tender on hard surfaces so he must have bad feet, right? And since the farrier wouldn't make the trip to the boarding barn where I kept my horses for just one horse, I had to have him at least trim my other horses as well.
Then something changed. I had to move my horses to a barn and pasture that I rented. Then I had the full responsibility of four horses on small acreage. The true cost of keeping horses, especially on small acreage is another article, but suffice it to say expensive shoes were no longer in the budget. 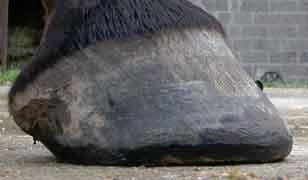
It was during this time that I began to research trimming. I found a lot of wonderful information on barefoot trimming and the mustang roll. Still, I couldn't wrap my brain around the possibility that little ole me could actually perform the mystical task of trimming my own horses' feet. I mean I am not a farrier. I am not the god-like creature that can make my horses' feet look absolutely perfect. After all, it is way too complicated for me to even attempt. I could seriously damage my horses and that is why I pay the big bucks to my farrier.
I was shaking like a leaf when I bought the rasp that I planned to use. I even purchased it online so no one would question the purchase or my lack of ability to touch my horses' feet with the rasp. Several days later the rasp arrived. "Now it’s real", I thought to myself. The next day I printed out the article on barefoot trimming that I liked the best and decided that I would start the trimming that weekend, after all, it had been several months since I had last paid a farrier to trim my horses and they were way overdue. It was my responsibility as the owner to care for their feet and since I had no extra money to pay a farrier, I was all they had.
The first thing I did was to take pictures of the horses' feet so that I could get before and after pictures. I'm going to show some of these pictures to really illustrate a couple points. The first, because of my utter lack of confidence in myself, I had allowed my horses' feet to get into absolutely horrific condition, which, is a complete failure as an owner. Second, this was the first time I had ever attempted to trim my horses' feet.
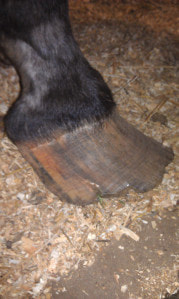
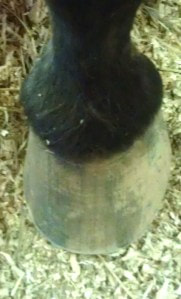
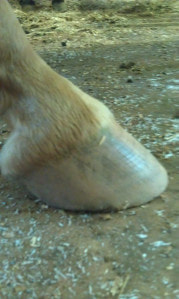
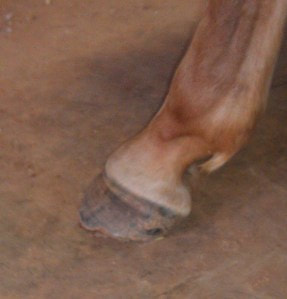
These first pictures are of my Appaloosa mare's feet. She was 28 years old. About ten years ago she contracted a rare form of vasculitis. The treatment left her foundered with sinking and rotation on all four feet. To be sure, I was as nervous as I have ever been when I first trimmed her feet. I had visions of a horribly lame horse hobbling around the field and a farrier chastising me for attempting to do something I was not qualified to do.
It is easy to see how overgrown her feet are but, you can also learn a lot from these feet as well.
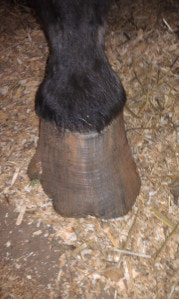
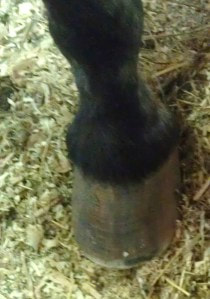
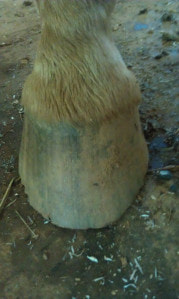
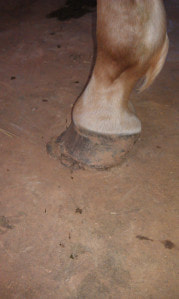
For instance, in the second picture, about halfway down the left side of the hoof you can see it really flare out to the side. The flare is happening because as the hoof grows out pressure is placed on the edges of the hoof, the over grown hoof then acts like a lever every time the horse goes through a stepping motion, pulling the outer hoof away from the connecting inner tissue and "stretching" the laminae. This stretching of the laminae can cause laminitis, an inflammation of the laminae, and even founder, where the coffin bone actually moves. Here is the same picture with a vertical line drawn through the hoof so to better illustrate the flare (the vertical line is not to show any trimming pattern just the flare). 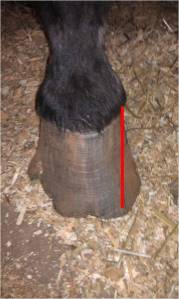
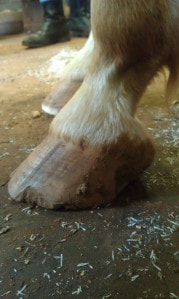
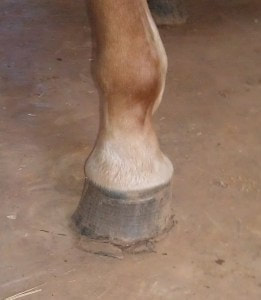
The fourth picture shows this well too as you can clearly see how the toe is starting to curl upwards. All of the mare's feet are misshapen and in horrible condition.
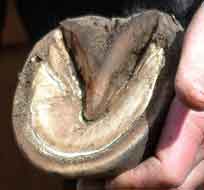
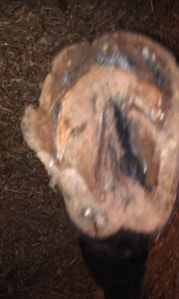
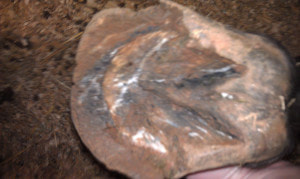
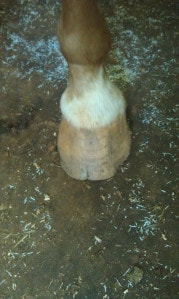
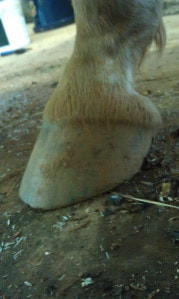
The two pictures of the underside of the hoofs actually show how much extra hoof she has. For these pictures I have crudely drawn where some of the parts are so that it is easier to visualize. 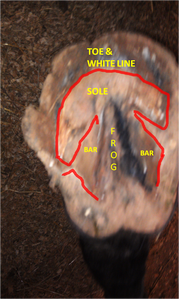
Take note at how long the walls are. This horse is standing on walls and no sole at all. Look how sunken the frog appears and how tall the bars and heel are.
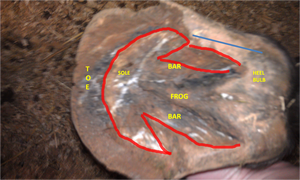
Again, look at how long the toe and walls are and how sunken the sole and frog appear.
My goal with this very first trim was to take as much of the toe and quarters (being the sides of the hoof) off as possible to stop the lever action of the long toe and also to take down the walls so they were level with the sole. And, not completely cripple my horse in the process since I had never done this before. So, with rasp in hand, I used a 5 gallon bucket to prop the horse’s foot on, took a long deep breath and began rasping, which by the way, is a lot harder than it appears. I also recommend wearing protective gloves as the rasp just slices right through skin.
Here are two after pictures, unfortunately, these are all I have of that first trim for this horse.
As you can see, the picture on the right shows that the hooves are still long, why, because I was so afraid of what I was doing I decided to err greatly on the side of caution which is perfectly fine. I figured out that it was perfectly fine to take your time and trim over several weeks. In fact, what I did was to initially trim every two weeks. Once I got the hooves where they needed to be, I took it back to every three weeks. This next horse is my Arabian gelding who was 23 years old at the time. His feet grow like land boats.
As you can see, his feet, although not wonderful, are not nearly as bad as the Appaloosa mare.
I like these two pictures as they show the trimmed hoof and untrimmed hoof. It is clearer to see the mustang roll (or my attempt at it) in these pictures.
The final horse was a real doozy. She is my Saddlebred mare who was 8 years old at the time and she is my baby. She has a club foot (it won't take long to tell which is the club in the pictures). She had just recently come out of shoes and had absolutely no hoof at all. This ended up being a double edged sword for me as I will explain.
Unfortunately I don't have any pictures of the after trim but it was mostly just cleaning up the hoof wall because there wasn't anything to take off...or was there? Oh, just so there is no confusion, the first picture is a back hoof, the rest are the front feet.
My "solution" to this no hoof dilemma was to let her grow hoof. Here is where my inexperience reared its nasty head. I just let her grow and grow and grow and then, poof, lame. I won't got into all the details, that is for another article but after $500 + in vet bills, a day long trip to a specialist, several weeks of worrying what might be wrong and two x-rays it was determined that she had developed laminitis. Though I was shocked because her hooves didn't look "that long" to me, I was mostly embarrassed. I immediately contacted the mystical farrier ready to take the punishment I so deserved and eat the several hundred dollar farrier bill I was going to get since I knew he wouldn't come out unless he did all of my horses. But, to add insult to injury he never returned my pleas for help. I felt abandoned and alone. Any confidence I had in my trimming abilities was shattered. My baby was crippled. She could barely move and it was all my fault. I wallowed in this grief for around a week and then decided I needed to bone up and take control of the situation. I examined her x-rays closely, I trolled the internet for any information on trimming a laminitic horse with a club foot and high heels. And, I bit the bullet and purchased a reasonably priced farrier stand. 
The first trim was really hard because she was so very sore. But, I threw caution to the wind believing that I could not make the situation much worse and went to rasping all of the extra hoof off until we were almost back to the sole. Hooray for myself...I was so proud until I saw her walk and she was still utterly lame. I went back to the internet researching more, doubting myself more.
Two weeks later, another trim and no change. By this time, I had decided that the healing process wouldn't happen overnight and resigned myself to "giving it time". Two weeks later, a glimmer of hope, as she trotted by herself for a couple strides, the first time she had done that in nearly four months. A week later, I realized that I had to start taking those high heels off so I again trimmed. She was still very sore and it was a battle to trim but this time, she left the barn at almost a natural gait and two weeks later she was walking almost normally with moments of trot and even canter back in her repertoire. Fast forward 6 years and I find myself again in the same spot. Horses with desperate feet, my baby going through a really bad laminitic episode and no farrier, the difference is, I am much more confident in my trimming abilities than I was 6 years ago. Yes, I did employ a farrier when I could afford it after I wrote the initial trimming article above. Why? Because I was busy and it was easy to pay the farrier to trim my horses. Of course that meant I had to have $170 for 4 trims, which I could pay until my significant other and myself parted ways and I lost his income. I was able to keep the farrier going until last year. So now I find myself in the same situation. I will post more on trimming in future articles, this article was to encourage you to learn to trim your own horse, to find the confidence in yourself even when things look bad and you mess up. Fortunately for us, horses are very forgiving, even when it is their feet. Trimming is an essential skill you should have in your skill set. The tools needed are minimal. I started with a rasp and a 5 gallon bucket. I eventually purchased a farrier's stand and believe it to be a completely worthwhile investment but it is not necessary. My horses' hooves are so much stronger and in such better condition since going barefoot that I will not shoe a horse again unless absolutely needed. There are some wonderful resources on the internet for learning to barefoot trim and using the mustang roll...even to help your horse through laminitis as was the case with me. Just don't let fear keep you from learning this essential skill and please, please, please don't believe that you can't trim your horse because you are not a farrier or that keeping beautifully expensive shoes on a horse's feet is essential to a healthy hoof because, in fact, a shod hoof is a weak hoof. 
Laminitis and founder could pose a huge problem to the horse owner in a time when calling the veterinarian is not an option. However, if it is diagnosed in time it can oftentimes be treated successfully so that the horse can carry on a normal and productive life. Unfortunately, diagnosing it may not be as simple as one would think.
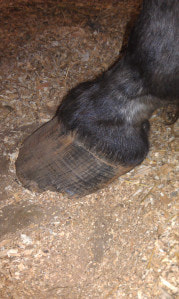
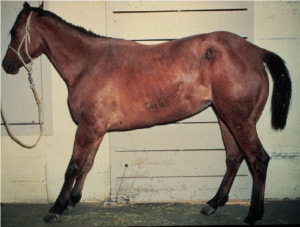
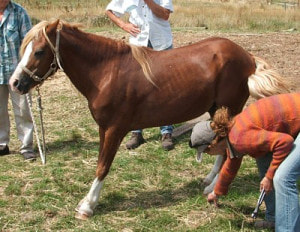
I consider myself an experienced horse person. I have been involved in horses for 36 years and believed I would be able to easily tell should one of my horses develop laminitis. I was wrong. I have always thought of a laminitic horse as being pushed back on its hind quarters with its front feet sticking far out in front of it in the stereotypical stance as in the pictures below.
Well I learned that yet again, nothing is stereotypical with horses so, I thought I would share my laminitis story to illustrate the need to be aware of the fact that laminitis comes in all "shapes and sizes".
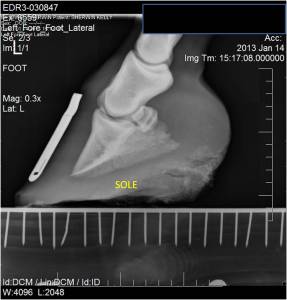
My baby is a 14 year old Saddlebred mare. I have had her since she was two and a half and had plans of training her to show but, my daughter and her horse have took center stage with my training time so my mare's training wasn’t completed. Her personality is nothing less than jovial and spunky. In November, 2013 I noticed that she was slightly lame on the left front leg (which is the same leg as her club foot). The lameness was very slight so I thought she had fallen or maybe been kicked by her pasture mate. Over the next few weeks the lameness didn't get any better. I gave her some Bute for a weekend to see if that helped (2 grams a day). The Bute didn't seem to help. I performed a "systems" check on her daily including feeling from her hoof to her shoulder for any signs of heat or inflammation. I didn't feel anything I considered unusual. Then, around Christmas, things really took a turn. She became lame on both front legs. She started walking as though she didn't know where the ground was under her front feet. She would also walk in a diagonal direction almost like she couldn't get her body to move in a straight line. And, her personality changed. She went from a jovial "spoiled brat" to lethargic and sometimes depressed. I had no idea what to do with these symptoms, so I turned to the internet. In researching her symptoms I came across EPM, a neurological disorder. All the symptoms she exhibited matched up and I began to really worry. The vet came out on a rainy day in late December. He took one look at her walk two steps and immediately said "she's foundered". I was shocked. Why on earth would she have foundered? She's not exhibiting the "founder stance". At this point I got my first lesson: a foundered horse will look as though he is walking on egg shells, or glass that he doesn't want to break. The vet immediately asked me when the last time her feet had been trimmed. My heart sank. I had been trying to let her feet grow out and really, they didn't look too long to me. He felt her hooves and her pastern area and said her hooves were "burning up". Really? They didn't feel hot to me. Here, I got my second lesson: I had no idea what a "hot" hoof felt like. So, the vet asked me if she'd been resistant to picking up her feet. No. He picked up her feet with ease and applied a hoof tester. She did not even acknowledge that the hoof tester has been applied to either hoof. Now the vet was perplexed. "She should have reacted to that." "Let me see her walk again". Up the pasture we go. Down the pasture we go. Down a hill we go. The vet is now as perplexed as I am. He agrees that she does not appear to know where the ground is under her front feet and she is not exhibiting so much of the "eggshell" walk. The vet says, "I'm thinking now that it is something neurological". Again, my heart sank. Now I am pleading with it to be laminitis. He drew several vials of blood, gave her an IV shot of Bute and gave me some Bute to give her for the next several days to see what her reaction would be. The next day she was almost completely normal. I was over the moon. The day after that she was a bit worse and the day after that just a bit better than when I called the vet. The vet told me that her blood looked fine but I had 3 options: 1) take her to a vet that could perform a spinal tap to determine whether or not she had EPM; 2) let her progressively get worse (if I couldn’t afford the vet expenses); or 3) put her to sleep. This news devastated me. She is MY BABY. I didn’t care if I never rode her again, I loved her and the news broke my heart. I couldn’t afford the thousands of dollars of treatment for EPM and I couldn’t put her to sleep so I put her back on Bute as it seemed to help and took a week to figure out what I was going to do. My decision was to take her to a large animal hospital to see a specialty vet recommended by my vet. This ended up being a great decision. The specialty vet really took his time with my horse. He took her through numerous neurological tests and then questioned me again about her feet. He told me she passed the neurological tests so he wanted to nerve block her feet to determine if her issues were really in the hooves. I agreed and at this point was praying for laminitis. My Baby is very stubborn so what should have taken 2 lidocaine injections took almost 10 before her nerves were sufficiently blocked. However, it worked. She gaited normally around the examination area and I was thrilled. The vet then recommended x-raying the hooves. I agreed. Below are the x-rays.
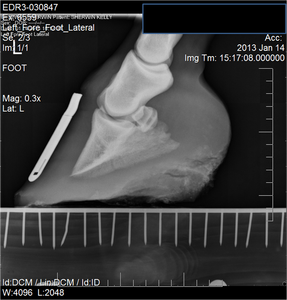
This first x-ray is of her left front hoof, her club foot. The second is her right front hoof. I'm going to try to explain a bit about this in the following pictures.
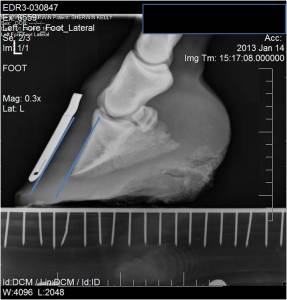
The bright bar on the front of the hoof is a piece of metal they stuck to the hoof wall so you can see clearly where the hoof wall is. Again, this is her left front hoof. The coffin bone can easily be seen "floating" inside the hoof capsule (it looks like a mini hoof). The leading "wall" of the coffin bone should be parallel with the hoof wall or, in this case, the piece of metal taped to the hoof wall. I have crudely drawn blue lines to indicate the direction of the coffin bone and the hoof wall. It is hard to see, but they are almost parallel but not quite thus showing the laminitis.
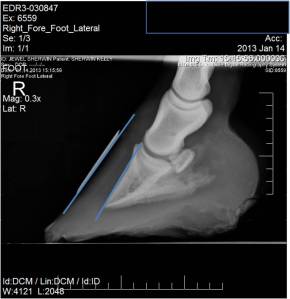
This is the right front hoof showing the same parallel lines. It is a bit clearer to see how the coffin bone is not quite parallel to the hoof wall in this x-ray.
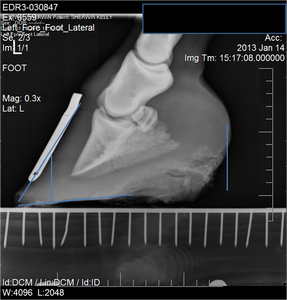
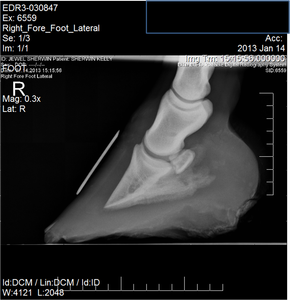
This is the left front hoof again. This time I have crudely drawn lines to show a few things. First I drew a line down the hoof wall, across the bottom of the hoof and from the heel bulb down. I also drew a vertical line from the hoof wall to the bottom of the hoof. This line is to show just how much toe is on this hoof. I'm not saying that you would trim the hoof using this line but you can surely see the extra toe. The vertical line at the heel is to show how high her heels are. She has always had high heels, a lot of Saddlebreds do but these are really high.
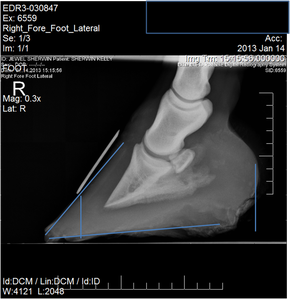
This is the right front hoof showing the same drawn lines. This picture really illustrates how much toe is on the hoof.
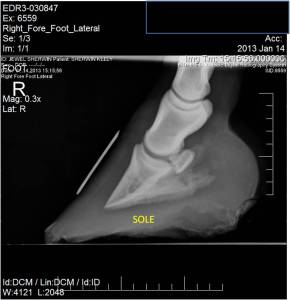
Now, the wonderful news about these x-rays is that there isn't a lot of damage (there is slight rotation but no sinking) and the damage should be fixable provided she receive the proper hoof care (again, see the article on trimming for more on this). I'm sure many of you are looking at the x-ray of the left front hoof and scratching your head as the coffin bone just doesn't look right. You have to remember that this is showing a "club foot", however, this can be mitigated by the right trim. What I did with this mare is kept the toes short and lowered the heels. By shortening the toe and lowering the heel you can effectively change the angle of the hoof and coffin bone by rotating everything forward and making the angles look much more natural. Ok so for an explanation of why her symptoms may have been so different as to suspect a neurological disease instead of laminitis, I have illustrated these pictures to show her sole.
She has a really nice thick sole and this sole masked some symptoms and changed the way some symptoms appeared.
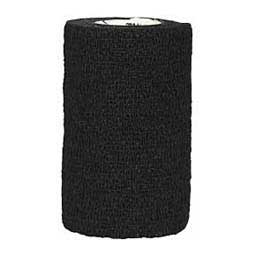
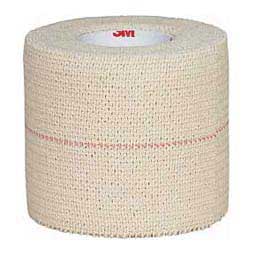
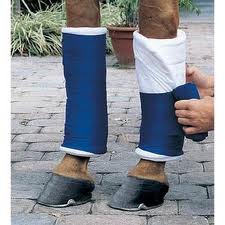
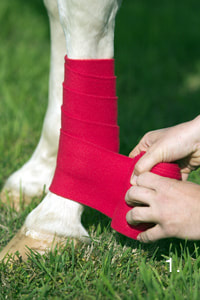
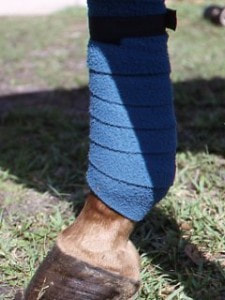
I received the laminitis diagnosis on January 14, 2014. By the first week of March and after three trims she was almost walking normally and occasionally trotted and cantered. Since this initial bought of laminitis, my mare usually goes through about 1 flair-up a year. She has had 2 really bad episodes, 1 in the summer of 2016 and 1 in the fall of 2019. Since 2013 a lot of information has come out about Insulin Resistance (IR) in horses. The testing is still expensive so I haven’t been able to have her tested but she checks all the boxes so, although I cannot be sure she is an IR horse, I now treat her as one. I will write about managing an IR horse as it is not an easy thing and can be exceedingly frustrating. Horse people love to put things on their horses whether its cutsie saddle pads or cool blankets, they just love to "dress" their horse up. This applies to what they put on their horse's legs as well. All you need to do is look in any horse catalog to see a multitude of devices meant to be used on a horse's legs from "sports" boots to jumping boots to skid boots to polo wraps, track bandages even magnetic wraps. It seems that for any possible reason you can imagine there is a wrap for that. And everyone is trying to convince us that their wrap is the wrap we need. Do we? I believe that certain wraps have their place in certain situations but I have always believed that the less we put on the horse's legs and the slower and more methodical we train the horse, the stronger the horse's legs will be. What I'm saying here is that, like most training devices, wraps have their place but can easily become a crutch not only to us but to our horses. Since the subject of wraps could take up an entire book, I am just going to speak about them in the sense of necessity. Wraps, in my barn, go under the category of medical supplies. So, here is what I have in my medical kit which constitutes my "wraps":  1. Polo wraps - These are usually 8 to 9 feet long and normally made from fleece. They will usually have velcro on one end to secure them together after being wrapped on the horse's leg. Polos do offer some support to the horse's legs which I think is more than enough in any riding scenario. When I worked my daughter and her Thoroughbred and knew they may do work with small corners and/or circles I would wrap the horse's legs with Polos. This was just as much for protection from him hitting himself as for support. Because they are made from fleece, they breathe, are absorbent and have "give" in them. If you are new to wrapping a horse's legs these wraps are a good beginning wrap. Polos can also have many more uses than just wrapping a horse's legs and that is another reason I keep them.  2. Track bandages - These bandages are usually between 9 and 12 feet long and made of a knit cotton. I will include "stable bandages" in this same category. They can have either velcro closures or string closures. They are less absorbent, less breathable and have much less "give" in them as compared to Polo wraps. These bandages are commonly used to wrap a horse's legs for "standing" wraps and also for trailering. Occasionally they are used for riding purposes but if you do not know what you are doing when wrapping a horse's legs you can really hurt a horse with these bandages. I keep these bandages for use as standing wraps and trailering, however, just like with the Polos, these bandages can be used for things other than wrapping legs. 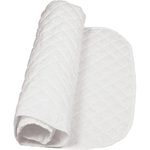 3. Quilted Leg Wraps - These wraps are usually made of cotton that has been "quilted". They can also come in a "pillow" version that is much puffer than the quilted version. These wraps are used underneath track bandages for standing wraps and wraps for trailering. They provide comfort, protection and support for the horse's legs. They are not used in riding. 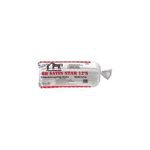 4. Cotton Sheets - This is a roll of cotton that has been made into sheets. You can use these sheets as you would the quilted leg wraps, underneath track bandages but these wraps can also be cut and torn apart to be used as smaller sheets of cotton so they have a lot of potential medical uses. 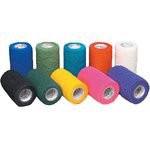 5. Vet wrap - vet wrap is a self-adhesive wrap that is used as a medical wrap for wounds. It can be used on humans and other animals, not just horses. It is breathable with lots of give but when stretched and secured it can become very tight. It is easy to cut or tear and is just a wonderful all around medical wrap. But again, it has so many more uses that it is a good prep in general. That is what I keep in my medical supply kit for wrapping horse's legs. So, how and when do you and should you use wraps on horses? First let’s tackle the how because it is extremely important. There are lots and lots and lots of good internet sites instructing people on the proper way to put on a variety of leg wraps. Why are there so many? Because you can really damage your horse if you don't know what you are doing. When putting any kind of wrap on a horse's leg you have to remember to start the wrap across the bone, the front of the leg, and only pull to tighten across the bone, which is front to back like so:  Standing Wrap Application: 1. Make sure your wraps are rolled correctly. You want the quilts to be rolled so that when you start rolling on the leg the "roll" is faced out like in the following picture. 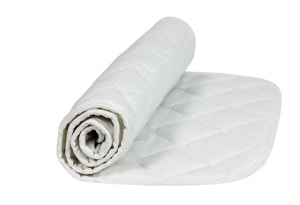 The Polo wraps or track bandages get rolled so that the velcro or string closures face each other: 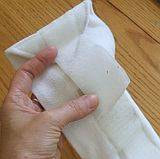 This way when you are at the end of the roll the velcro or string is on the outside of the wrap and is easily secured to each other. Again, you want the "roll" to be facing out while you wrap. 2. Standing wraps are going to run from right below the horse's knee to right below the horse's fetlock (sometimes the quilts will be longer so the wrap will go down to the pastern). You want to begin by placing the leading edge of the quilted wrap to the inside of the horse's leg and roll around the front of the leg to the back until the roll is finished. Remember to only tighten the quilt from front to back, never pull on the tendon. 3. Once you have the quilt on, you want to place your track bandage on. Again, have the roll facing outward. Some people tuck the leading edge of the roll under the quilt flap which is fine as long as the flap is facing the front of the leg so that when you do your first wrap with the bandage you are not pulling on the tendon. Some people begin the wrap at the top of the leg and some people begin in the middle of the leg. Either way, place the leading edge of the bandage on the inside of the horse's leg and wrap it from front to back. 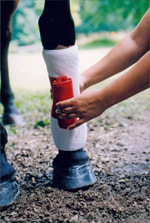 4. You want to wrap the leg so that the bandage goes from the bottom of the horse's knee to the bottom of the fetlock. The wrap needs to be smooth and even with no bunching and with even pressure from top to bottom. Here is a picture of a finished standing wrap: 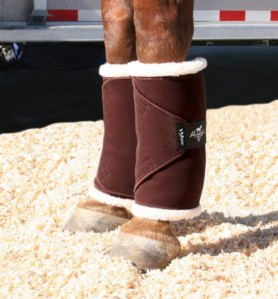 Polo Wraps Application: It is essentially the same wrapping technique as above but without the quilt. 1. Begin with the wrap just under the horse's knee on the inside of the leg and begin wrapping from front to back making sure only to tighten across the front of the wrap. Wrap smoothly with no bunching all the way to the fetlock. 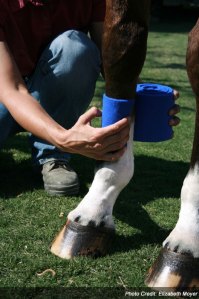 2. Once you get to the fetlock, you can either stop and begin wrapping back up the leg or you can wrap around the fetlock for additional support.
3. After going around the fetlock begin bandaging back up the leg in an even manner. Ideally you want to end the bandage back at the top of the leg with the velcro facing towards the rear of the leg. My suggestion to those who are not experienced with wrapping, get on the internet and look at all the legitimate videos you can find and then practice, practice, practice. Sometimes it takes me a couple tries to get the wrap the way I want it if I haven't wrapped in several months. Why do you want to wrap your horse's legs? You really need to give this some thought. Wrapping sure does look cool but that is not a good reason. 1. Riding - I will occasionally wrap when I ride. Mostly it is for protection from the horse itself. When lunging or making small circles or corners it is much more likely that the horse could hit itself and the wraps add a bit of protection from that. A lot of people wrap believing it to help the horse with their training, giving the horse the support it needs to do what you are asking it to do. If that is the case, you have no business asking the horse do whatever it is you are asking of it. If you are worried the horse is going to bow a tendon or pop a splint then you are asking too much of the horse in its present condition. Consistently using wraps on a horse will have the opposite effect of support, it will become a crutch to the horse and when the day comes that you don't or can't use wraps you very well could end up with a horse with leg issues. The smart thing to do is take your time and train your horse at its pace. And be careful if using neoprene wraps as neoprene does not breathe well and you can end up damaging your horse’s legs. Also be aware of what is happening to the wraps as you are riding or working the horse. If you haven't wrapped correctly and the wraps slide down or twist and bunch you could be doing damage to your horse. 2. Treatment - A lot of people will apply standing bandages (also called stable bandages) to their horse's legs after they have had a hard workout. They are also commonly used for horses that "stock up" when standing in their stall. Stocking up occurs when edema (fluid) builds up in the lower leg of the horse and makes it swell up. 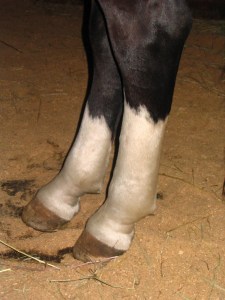 The swelling will go down once the horse is exercised or turned out. If the swelling does not go down then something else is going on with the leg.
Remember that when you wrap a horse's leg you are immediately increasing the heat to the leg. And, some things are better treated with cold than with heat, like stocking up. It is better to hose the legs with cold water than to wrap the leg for horses that tend to stock up. Liniments and poultices are also sometimes used beneath a standing bandage. I use this method occasionally. If I believe the horse's legs have been strained in a training session I will apply liniment or a poultice and wrap it, leaving the wrap on while the horse is hand walked to cool off, then I remove the wrap and wash down the legs with cold water. I am very wary of leaving things on underneath a wrap for an extended period of time (like overnight) as it could "burn" the horse or cause added irritation. However, should a horse receive a wound on it's leg you might have no choice but to wrap it in order to treat the wound, therefore, wrapping is an essential skill to learn so that you are prepared in the event a vet is not just a call away. There are definitely legitimate medical and training scenarios where you will need to wrap a horse's leg, therefore, having the needed equipment and knowledge on hand is an essential skill for an equestrian. I do want to stress again that if you are inexperienced with wrapping please do your research and/or ask an experienced wrapper to help you prior to wrapping your horses and then practice, practice, practice. It is not a hard skill to learn but it is important to learn to do it correctly. This article is meant to assist the horse owner in feeding their senior horse, which can be no easy feat and does relate my positive experience with Purina Ultium. Traditionally a horse that is over the age of 15 years is considered senior. I think that until the last decade most equestrians would have agreed but with better nutrition and veterinary care 15 is the new 8 or 10. It is common now to see horses performing at high levels into their early twenties. So, is a 15 year old horse really a senior? That depends on the horse. What makes a horse “senior”? This is the same question as what makes a human “senior”. It is a biological and physiological question. The most basic and broad answer is when the body starts to act like a senior. When arthritis sets in, when teeth wear out, when the body has difficulty processing nutrients, when the immune system slows down. All of these are signs and signals that a body is aging, is becoming senior. These don’t all usually happen at the same time, although they can thus the expression, “he/she seemed to age overnight”. For this article I am going to break the term senior down into two categories: 1. Senior and; 2. Geriatric. I will consider senior to be a horse over the age of 15 who is not experiencing the biological and physiological breakdowns associated with aging to the extent it is affecting their overall care. The geriatric horse would then be considered a senior horse who is having one or more biological or physiological issues that affect their care on a daily basis. The everyday horse owner has little experience with senior or geriatric horses. Horses are expensive to own. The everyday horse owner usually owns a horse between 5 years and 15 years of age. A horse they can ride. Not only that, if you buy a horse at 5 years old and continuously own it, it is most likely not going to be until 15-20 years down the road before you are dealing with a senior or geriatric horse. So, it’s kind of like having a foal, not a lot of everyday horse owners have experience with broodmares or foals because they tend to purchase and keep adult horses which have already been trained for riding and/or driving. My first experience with a senior and then geriatric horse came just a few years ago with a mare I had owned since she was a 4 year old. She was one of those super easy keepers all the way until she was 31 year old and then it was like a switch, she went from senior to geriatric. The first changes were just a lack of movement. She stayed in the barn a lot more, she didn’t run around the field – just a very general but marked slowing down. Then, came the weight loss. It took a year, I went through so many feeds – everything from lower end to specialized; different hays, supplements, wetting foods, etc. In the end, it made no difference. Whatever was going on internally (most likely cancer) was not to be beat and 5 months after her 32nd birthday we put her to sleep. The experience was like being thrown into the deep end of a frozen lake. It was excruciating and something I never wanted to go through again. Unfortunately, that choice was not mine to make, I had 2 seniors sitting out in my field and another not far behind. Colby is a 20-something Thoroughbred gelding. He is built like a tank and is a very easy keeper (unusual for a Thoroughbred). His teeth are worn but in relatively good shape. DD is a 33 year old Arabian gelding. He’s always been a fleshy, well-muscled horse and an easy keeper. His teeth are very worn and he has trouble eating forage. In the fall of 2018 I moved Colby and DD to my house. I had about 1.5 acres fenced with grass. I grained them and hayed them. Unfortunately it was an extremely wet winter so any grass I had was obliterated. It was also a cold winter. Neither horse came through the winter in good condition. DD lost a considerable amount of weight, to the point I believed there may have been other issues at play. Colby lost some weight but maintained overall condition. For most of the winter I fed the horses a combination of Legends Carbcare Senior, alfalfa hay pellets, beet pulp and fescue hay. It was not a cheap winter and still the horses dropped weight. Towards the end of winter I switched feed to a cheap 9% Tractor Supply Producer’s Pride feed and threw the grain at them. Slowly DD started to put weight back on but it was exceedingly slow, even when the grass came back and I fenced in more pasture. I realized that he needed more. The first thing I did was start buying alfalfa hay and supplementing his feed and grass with the hay. Then I looked for another feed, a feed I could add to the cheap feed to kick it up and that’s when I saw the Ultium. Purina Mills Ultium is labeled as a competition horse formula. It is a feed developed by Purina specifically to meet the high energy demands of horses in strenuous work and competition. I had used Ultium before. I had a Thoroughbred that was a very hard keeper, he just had the type of metabolism that used everything that went in. In an effort to put weight on him I went through all kinds of feeds and supplements with little success. Ultium had just come out and I was told at the time it had been developed for race horses. I was sold and tried the feed. It worked better than anything I used before or after and was the only time in my experience around that horse that he actually held weight. That experience came back to me as I stared at the bag of Ultium at Tractor Supply. It’s not cheap at almost $26 a bag but not much more expensive than the other Senior feeds so, I grabbed 2. The label lists 3 types of horses – moderate work, heavy work, very heavy work. I went with moderate work. DD is normally 900lbs (he wasn’t at the time). Based on that information the bag recommended 5.5lbs a day. I went with 6lbs plus another 2lbs of the cheap feed. For Colby I went with 4lbs a day plus 4lbs of cheap feed even though he weighs around 1,200lbs as his weight loss wasn’t nearly as drastic. I immediately saw changes in DD’s overall appearance. His coat shined up, his energy level went up and his weight increased at a nice steady rate. By the beginning of July, he was back to his optimum weight and I was hooked on Ultium. So, what is it about Ultium? Well, you have to look at the label but before that, you have to ask yourself what are the 3 most important components of horse feed? Protein, fat and fiber. What I have read about senior horse nutrition is that they need more protein and fiber than a younger horse. This seems to be supported by the feed companies because if you look at the labels (which we will) of senior horse feeds they are high in protein and fiber. Why does protein matter? First, as horses age their ability to absorb protein decreases. If a horse cannot get enough protein from what it eats, then the body will begin to break down muscle tissue for the protein and you will see a loss of muscling in the horse. That being said, you have to be careful when feeding high amounts of protein as it causes other strains on the horse’s body. Simply said, if you are not seeing a loss of muscle in your horse, it is getting enough protein to maintain muscle mass which, in a retired, senior horse that is all that you need. What about fiber? Horses use fiber as an energy source. You want to make sure your horse continues getting enough as it ages and its teeth wear. Owners are not generally following a horse around making sure it is able to graze properly so, sometimes, it takes an episode of weight loss to bring attention to the owner that the horse is having issues with grazing or eating hay. In DD’s case, he is able to eat his grain fine but he struggles a bit with hay and grass. Last but not least is fat. Horses use fat as an energy source but it is not a main energy source and is harder for the horse to use so, it oftentimes gets stored by the horse as fat. You need to make sure before adding additional fat into a horse’s diet that the horse has no liver issues since all fat travels through the liver. It is not hard to see, based on those explanations, why feed companies would lean towards higher percentages of protein and fiber in a horse’s feed and, most of the time this would be right. Ok, let’s compare some feed using the 3 major components of protein, fiber and fat. I am going to focus on the big feed brands that can be found at Tractor Supply and Southern States as most people have access to at least one of these chains and local feed stores usually sell at least one of the major brands.  As you can see, none of the senior feeds come close to Ultium’s fat percentage at 12.5%. Ultium is also highest in fiber percentage at 18.5%. It has the lowest protein percentage at 11.7%.
I fed Legends Carbcare Senior most of last winter with dismal results. Looking at the protein and fiber the horses should have been able to maintain well. To be fair, Colby lost some weight but not enough that I was concerned. Going back to the big three, both horses are completely retired so any energy they expend is simply to walk around the field and keep warm. 17% protein is too much and being wasted at best, at worst causing an unnecessary burden on the horse’s system. 18% fiber is good and that, plus the other additives of beet pulp and actual hay is what kept any weight on the horses. 7% fat is not good at all and I think the main reason for the dramatic drop in weight. I would not have done much research into the feeds if I hadn’t had such an issue with weight loss over the winter. When a good brand feed markets a feed specifically for senior horses you think it will work for your senior horse but that is not the case. Each horse is different. My experience has been that for my senior Thoroughbred and geriatric Arabian the combination of high fiber and fat in Ultium is the right combination to put weight back on them and keep it on them. I am going to caveat this by saying that a good-quality hay is also key and part of this feed regime so, Ultium is going to have to share the credit and I will talk about hay in another post. I also cannot let the reader forget that I use a cheap feed to supplement the Ultium as well. I changed the cheap feed from the Producer’s Pride to a 9% feed I get from my local feed store. I consider this feed as more of a filler and it doesn’t factor in much with changes I make to the feeding regime. As a last note, I found too that Ultium is very palatable and easy for the horses to eat even with worn (but functional) teeth. For horses who need a slurry I would imagine the feed would wet down nicely as well. |
 AuthorMother and daughter team taking on the dream and challenge of farming. Archives |


 RSS Feed
